

Lighting for Open Floor Plans: The Best Lighting Ideas for Open-Plan Living Spaces
An open-plan layout removes the walls.
But the different uses do not disappear with them.
Within the same sightline, people cook. Eat. Read. Work. Relax. Welcome guests.
That is exactly why lighting an open-plan layout is more demanding than lighting several smaller rooms. The light needs to distinguish one area from another — without visually breaking the space apart again.
.jpg)
It is several uses, visible at the same time.
When walls disappear, one seemingly simple solution quickly suggests itself: a regular grid of ceiling spotlights across the entire floor area.
Technically, this can provide enough light everywhere.
Spatially, however, it often does the opposite of what an open-plan layout is meant to achieve.
The kitchen, dining table and sitting area receive the same brightness. The room loses rhythm. Different functions blur into one uniformly illuminated surface.
Open space therefore needs legible differences, not uniformity.
The dining table can feel different from the kitchen counter. A quiet seating zone can be considerably darker than a work surface. A wall can remain visually present while the floor in front of it recedes.
Cooking, eating, reading and relaxing all require different amounts, directions and positions of light. The furniture layout should therefore be sufficiently clear before the electrical planning is finalised.
The zones can differ, but they should not feel like three unrelated rooms. Quiet background lighting on selected walls or architectural surfaces can connect them.
This might be a pendant above the table, light on a kitchen wall or a low-level luminaire in a seating area. Not every zone needs its own ceiling fixture.
In open spaces, several functional areas are often visible at the same time. It should therefore be clear which luminaire leads visually and which one recedes.
Individual lighting groups need independence. At the same time, scenes should coordinate several areas so that the open space still reads as a whole in the evening.
The spaces between kitchen, table and seating determine whether the layout feels fluid or fragmented into isolated pools of light.
.jpg)
Open spaces need to achieve two apparently contradictory things at the same time.
They should belong together. And individual areas should still have their own function.
Lighting can take on exactly these two levels.
Calm light on selected walls, architectural elements or room boundaries visually holds the entire open area together.
Kitchen, table and seating areas receive precise light for their individual tasks and can be dimmed independently.
Art, shelves, materials or individual luminaires create focal points and add depth to the room.
The important point: not every layer needs to appear everywhere.
An open-plan layout becomes more interesting when the density of light varies.
Zoning is useful.
But six different statement luminaires in one open space are not zoning.
They are six visual protagonists.
An open-plan layout needs hierarchy.
Perhaps the pendant above the table takes the lead. The kitchen remains more architectural. Other areas use lower or more restrained light sources.
The zones become clearly different — without competing with one another.
.jpg)
When selecting luminaires, one question comes up again and again: do adjacent areas need to use the same lighting family?
No.
The much more important question is: which luminaires are visible at the same time?
A large pendant above the table may be visible from several areas. Other light sources may sit directly behind it. A lower luminaire may appear in the foreground.
What matters is therefore not that all of them share the same shape or finish.
They need a clear visual relationship.
- Which luminaire should be the strongest focal point?
- Which one can almost disappear?
- Which heights overlap from the most important viewpoint?
- Does a luminaire block the view through the room?
- Are there too many bright light sources in the direct field of view?
That is the difference between combining products and designing a lighting composition.
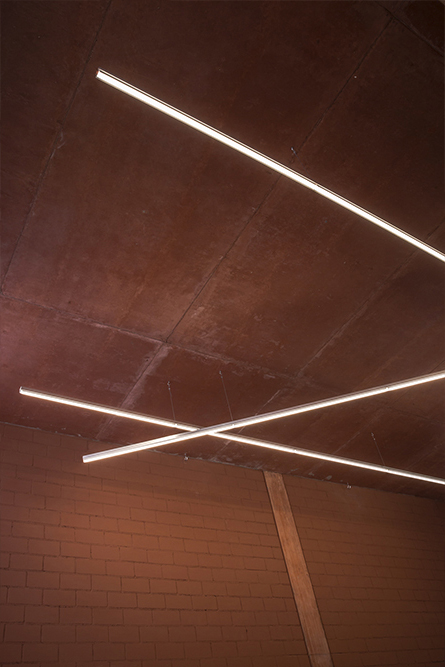
Good lighting design rarely begins with a completely blank page.
At Am Lokdepot there were clear parameters: existing electrical outlets, a tight budget and an open space containing different uses and levels.
Instead of hiding these restrictions, they became the starting point of the design.
Studio De Schutter developed what it calls Light-Hacks.
The principle behind them is surprisingly simple: standard, readily available lighting components are combined in such a way that they become an individual solution.
This is particularly interesting for open-plan layouts.
Not every zone requires an expensive custom luminaire. Often the stronger design comes from how simple components are arranged, combined and integrated into the architecture.
Good design does not necessarily begin with a custom product.
It begins with a good idea.
Many open-plan layouts are designed as three islands:
Kitchen. Table. Seating.
Yet the real advantage of an open-plan layout is the space between these functions.
If only the individual islands are lit, isolated bright patches appear in an otherwise dark room at night.
An illuminated wall, a shelf, an architectural element or a restrained background layer can connect these zones.
Transitions do not need much light. They need continuity.
One of the clearest differences between average and well-designed lighting often becomes visible only late in the evening.
Does the entire kitchen really need to remain bright when it is no longer actively being used?
No.
Perhaps only the illuminated back wall remains on. Perhaps a small amount of indirect light. Perhaps a pendant at a very low intensity.
The kitchen remains visible as part of the open space.
But it is no longer functionally dominant.
This is where darkness becomes a tool for zoning.
Not switched off versus switched on.
But: present versus active.
Work surfaces need clear, directed light. Instead of making the entire kitchen maximally bright, the countertop, hob and sink should work reliably. Cabinet and wall surfaces can form a calmer background layer.
The table is often the easiest area in which to concentrate light spatially. A pendant can provide functional light, become a focal point and subtly define a zone within the open-plan layout at the same time.
Floor, table and wall luminaires suit seated activities better than an exclusively bright ceiling. The light level can be considerably lower than in functional work areas.
An illuminated wall, artwork or architectural element can hold the sightline together. The transition rarely needs its own dominant luminaire.
Different functions do not automatically require different light colours.
At first, it sounds logical:
Kitchen slightly more neutral. Dining warmer. Seating warmer still.
In separate rooms, that can work well.
In an open-plan layout, however, these light colours are visible directly next to one another.
Large differences can therefore feel restless and visually separate the shared room more strongly than intended.
For many open spaces, one coherent base colour temperature is the calmer solution.
Around 2700 K or 3000 K can work depending on the materials and use. Zoning can then happen more strongly through intensity, direction, distribution and height.
Warm Dim can also help individual areas become warmer in the evening without giving them a completely different character during the day.
Perhaps the most practical question is: what happens when two things take place at the same time?
Someone is cooking. Others are already sitting at the table. Another area is being used more quietly.
That is when it becomes obvious whether the lighting has really been planned.
The lighting groups should fundamentally remain independently controllable. In everyday life, however, it is often more convenient to combine them into scenes.
In open-plan layouts, zoning is often imagined only on the floor.
Kitchen here. Table there. Seating behind.
Am Lokdepot demonstrates another possibility.
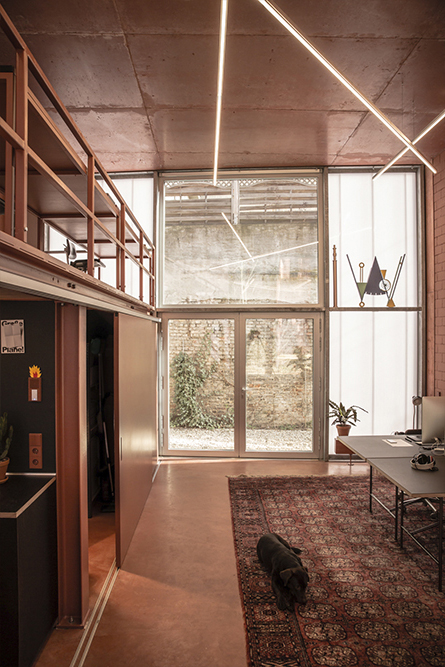
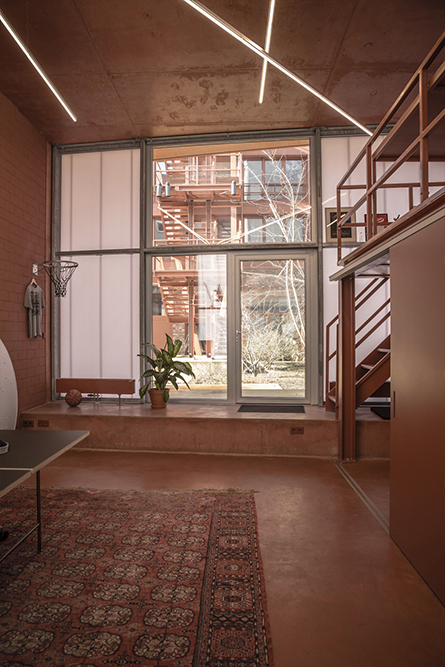
Linear lighting structures are suspended at different heights within the open volume. They therefore work not only with individual surfaces, but with the full height of the room.
A second Light-Hack solution takes a translucent material already present in the architecture and uses it for a backlit ceiling in the kitchen area.
The light therefore does not define function through an imaginary line on the floor.
It defines it through height, material, direction and architectural integration.
That principle is highly relevant to open-plan layouts.
A dining area can feel more concentrated through a lower pendant. A seating area can be brought closer to the human scale through wall and furniture lighting. The kitchen can merge more strongly with the architecture.
One room. Several functions. Different scales.
- Which activities take place simultaneously in the open space?
- Which zone needs the highest functional light level?
- Which luminaire should be the visual protagonist?
- Which luminaires are visible from several zones at the same time?
- Which wall or surface visually connects the room?
- How does the kitchen remain visible when it is no longer actively used in the evening?
- Which lighting groups need independent dimming?
- Where are sockets needed for floor and table lamps?
- Which areas do not need additional ceiling lighting at all?
- How does the lighting concept change between daytime, cooking, dining and late evening?
- Placing a downlight grid over the entire floor area: every zone is treated equally even though the functions are completely different.
- Giving every zone a statement luminaire: several strong focal points compete within the same sightline.
- Planning only the individual zones: without connecting background light, dark gaps can appear between them.
- Keeping the kitchen fully bright in the evening: functional lighting can then dominate the entire open space.
- Combining too many different colour temperatures: in one open room they sit directly beside each other and can visually fragment the space.
- Considering floor and table lamps too late: without suitable sockets they may later end up in awkward positions or require visible cables.
- Planning only on/off instead of scenes: open spaces accommodate many parallel uses.
- Ignoring sightlines: a luminaire can look perfect from its own zone and still disturb or glare from another viewpoint.
A good approach is to combine separately controllable functional zones with one shared background layer. The kitchen, dining table and seating areas each need appropriate light, but should remain visually connected through walls, architecture or restrained general lighting.
Differences in light intensity, height and direction are particularly effective. A pendant can define the dining table, precise task lighting can mark the kitchen and lower light sources can gather quieter seating areas. Physical room dividers are not necessary.
No. An even grid of ceiling spotlights can actually be counterproductive because it flattens the differences between functions. Spots should be used where they perform a specific task — for example on work surfaces, walls, artwork or defined circulation routes.
In open-plan layouts, a largely coherent colour temperature often feels calmer because several light sources are visible at once. Around 2700 K or 3000 K can work depending on materials and use. Differences between zones can be created more effectively through brightness, direction and dimming.
There is no fixed number. The important point is that functionally different lighting groups remain independently controllable. Kitchen, dining table, seating areas, accent lighting and indirect lighting should not necessarily be tied to one shared switching state.
Ideally before electrical outlets and ceiling points are finalised. Furniture positions, kitchen planning, dining table, sightlines, sockets, artwork and desired lighting scenes all have a major influence on the optimal position of light sources.
Still
clear spaces.
The fewer architectural boundaries a room has, the more tasks the lighting takes on.
It supports function. Defines areas of use. Organises sightlines. Connects transitions. And changes the room throughout the day.
Studio De Schutter therefore develops light not as a grid placed over an open floor plan, but as a spatial system.
Which zone leads? Which remains in the background? What needs to work simultaneously? Which luminaires are visible from several viewpoints? And how does the hierarchy change in the evening?
This keeps the layout open.
But not undefined.
Contact Us:
