

A lighting calculation can be technically correct and still produce a disappointing space.
The required illuminance may be reached. Uniformity may remain within the defined range. Glare values may appear acceptable. Every luminaire may be documented precisely.
Yet the room can still feel flat. Faces can remain dark. Materials can lose depth. The ceiling can become visually restless.
DIALux lighting design becomes valuable when calculation and visual judgment are developed together.
DIALux provides a digital environment for modelling architecture, positioning luminaires, using photometric product data and evaluating how light reaches defined surfaces.
This makes invisible relationships measurable before installation begins.
Check requirements
Evaluate whether the proposed lighting reaches the relevant task areas and project-specific performance targets.
Test alternatives
Compare optics, positions, mounting heights, lumen packages and luminaire arrangements before committing to installation.
Connect disciplines
Align lighting with architecture, furniture, ceilings, building services, controls and the actual use of the room.
Make decisions visible
Communicate calculation surfaces, luminaire data, results and assumptions in a format the wider project team can review.
The most important decisions in a DIALux project are often made before the first luminaire is inserted.
What is the space used for? Where are people actually positioned? Which surfaces carry the visual task? What should be visible first? Which zones require calm, contrast or orientation?
A calculation model without a clear design question can generate a large amount of information without producing a useful answer.
The software needs a defined task.
- Which activities must the lighting support?
- Where are the relevant working, reading or circulation surfaces?
- Which observer positions are important for glare evaluation?
- Which materials and reflectances influence the room?
- Which daylight conditions should be considered?
- Which elements should form the visual hierarchy?
Only then can the digital model be structured around the way the completed space will actually be used.
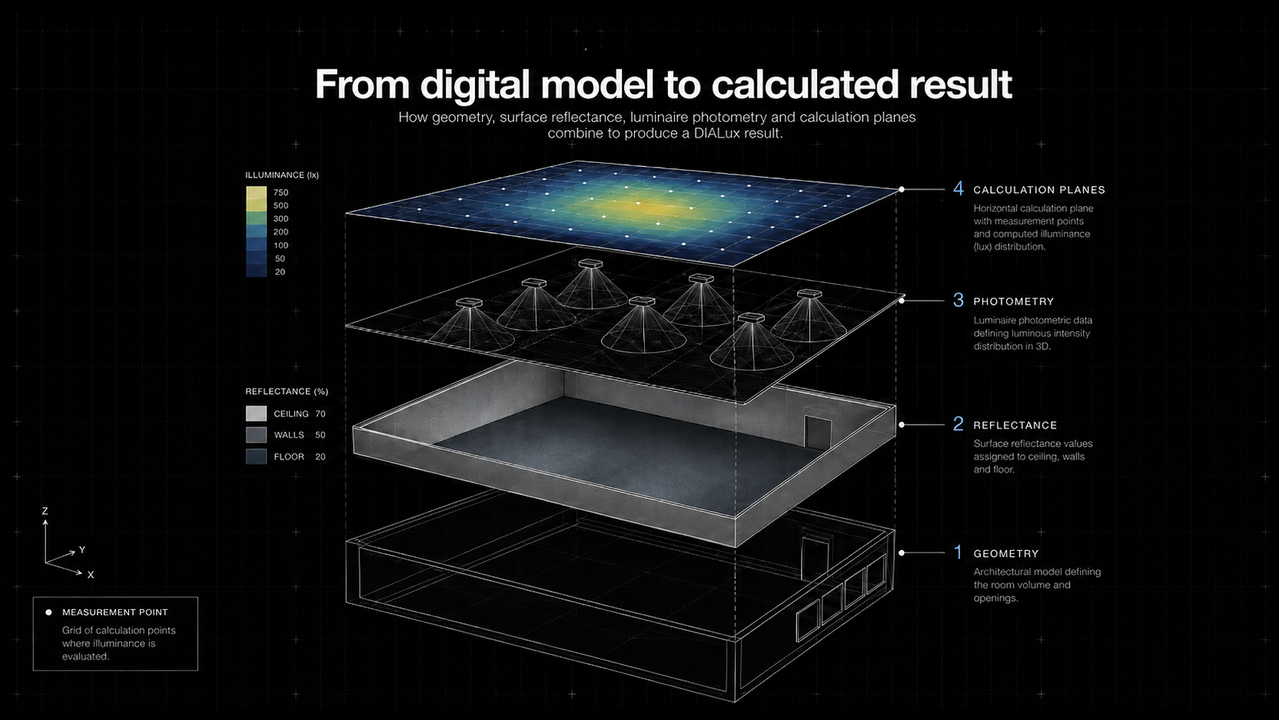
A DIALux model connects several layers of information.
The architecture defines distances, dimensions and openings. Surface properties influence how light is reflected. Photometric files describe how individual luminaires distribute luminous intensity. Calculation objects define where results are evaluated.
Change one of these layers and the result can change with it.
This is why a DIALux result should never be read as an isolated number.
It is the output of a specific model with specific assumptions.
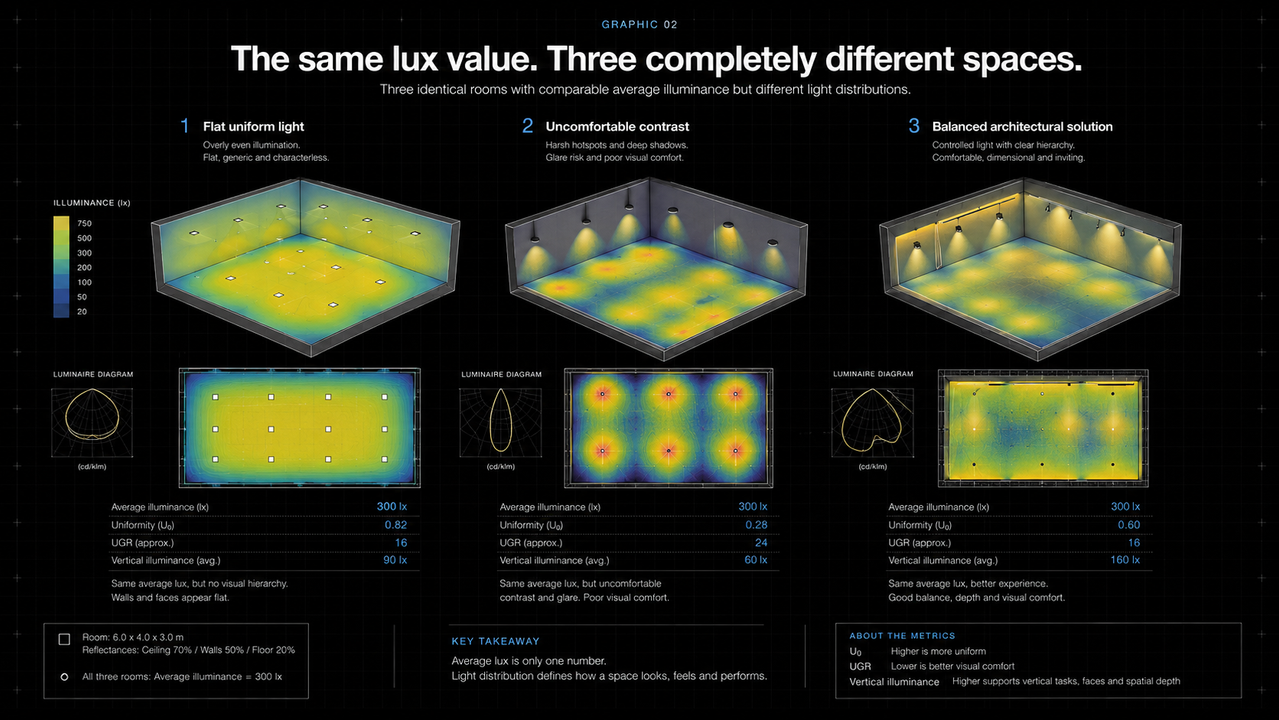
Average illuminance is useful. It describes how much light reaches a defined surface across a calculation grid.
But one average cannot explain how a room is experienced.
Two schemes can produce a similar average value while creating entirely different spatial conditions.
Indicates the planned light level after defined reductions for ageing, dirt and maintenance have been considered.
Shows how evenly light is distributed across the calculation surface. High uniformity can support visual tasks, but excessive uniformity can also remove hierarchy.
Helps assess whether bright sources may cause discomfort from relevant observer positions and viewing directions.
Influences faces, walls, shelves, signs and orientation—elements that a horizontal working-plane calculation may not fully describe.
A technically strong study evaluates the metrics that correspond to the real visual task.
Not simply the values that are easiest to produce.
Many calculations begin with a horizontal working plane.
This is appropriate when the visual task takes place on a desk, counter, floor or other defined horizontal surface.
Yet architecture is not experienced only horizontally.
People look at faces. Walls. Doors. Products. Artwork. Signs. Shelves. The route ahead.
A room may reach the required value on the floor while remaining visually dark at eye level.
Vertical surfaces often determine whether a space feels bright, open and understandable.
This is especially relevant in reception areas, retail environments, hospitality spaces, circulation zones and workplaces where communication between people matters.
Discomfort glare depends on a relationship between bright sources, their apparent size and position, the surrounding luminance and the direction in which the observer is looking.
The same luminaire can therefore create different conditions in different rooms—or from different positions within the same room.
A meaningful glare evaluation should consider:
- The actual observer position
- The expected viewing direction
- The mounting height and luminaire arrangement
- The brightness of the surrounding surfaces
- The geometry and apparent size of visible sources
- Reflections from glass, screens and polished materials
A low value in one calculated direction does not automatically describe every experience in the room.
The model should be reviewed from the positions people will actually occupy.
DIALux calculates the model it receives.
It does not know whether the assumed ceiling height is outdated, whether the furniture layout has changed or whether a surface reflectance was selected because it was accurate—or simply because it was the default.
A highly detailed output can therefore create a false sense of certainty.
The calculation may be precise while the assumptions are wrong.
This is one of the most important distinctions in digital lighting design.
Dimensions and positions
Ceiling heights, room proportions, openings, mounting positions and distances directly influence the calculated distribution.
Reflectance and material
Dark floors, bright ceilings, timber walls and reflective finishes return very different amounts of light to the room.
The exact optic matters
A narrow beam, wide beam, asymmetric distribution and diffuse source may belong to one product family but create fundamentally different results.
Plan beyond opening day
The maintained result should account for how the installation changes through ageing, contamination and maintenance intervals.
Measure the correct surface
The height, position, size and orientation of the calculation surface must correspond to the actual task being evaluated.
Location and openings
Orientation, window geometry, building position and the selected daylight condition influence the relationship between natural and artificial light.
Photometric files describe how luminous intensity is distributed in different directions.
They allow a digital luminaire to behave far more realistically than a generic point source.
But the file must correspond to the product that is actually intended for the project.
- Correct luminaire version
- Correct optical system
- Correct lumen package
- Correct dimensions and orientation
- Correct mounting condition
- Relevant product and light-source information
Selecting a similar-looking file from the same product range can alter beam width, peak intensity, spacing and glare behaviour.
The model should represent the specified luminaire—not an approximation that happens to share its name.
Translate activities, architecture, standards and design intent into clear lighting tasks.
Model the elements that influence the calculation without filling the project with unnecessary digital detail.
Assign realistic reflectance values and create calculation objects for the actual visual tasks.
Use the correct luminaire data, optic, output and installation position.
Read numerical values, false-colour views, isolines and spatial visualisations together.
Adjust the concept, compare alternatives and record the final assumptions and results clearly.
The real value of DIALux is not producing one completed calculation.
It is revealing where the first idea needs to improve.
Perhaps the required value is reached, but only through unnecessary energy use. Perhaps the working plane is uniform, but the walls remain dark. Perhaps the spacing works numerically, but the ceiling becomes too dense. Perhaps one optic solves the centre of the room while producing excessive light at the edges.
These are not failures of the calculation.
They are the information needed for the next design decision.
A strong workflow repeatedly moves between digital evaluation and architectural judgment.
Model · Calculate · Read · Adjust · Compare
Visualisations are valuable communication tools.
They can show where light lands, which surfaces become visible and how different layers relate to the architecture.
But a convincing image can still hide weak assumptions.
Exposure, screen brightness and image settings can make a scene appear brighter, softer or more dramatic than the numerical result suggests.
Conversely, an aesthetically simple visualisation may represent a highly considered and technically robust concept.
Renderings explain the idea. Calculation results test it.
Neither should be used as a substitute for the other.
Windows, rooflights, orientation and external obstructions influence how much electric light a space needs—and when it needs it.
DIALux can bring daylight and artificial lighting into the same project model, allowing their relationship to be evaluated more deliberately.
Yet daylight is not one fixed condition.
It changes with location, orientation, time, sky condition, glazing and the geometry around the building.
A useful daylight study therefore begins with a clear question.
- Is the objective visual comfort near the façade?
- Should artificial light respond to daylight availability?
- Are darker interior zones dependent on permanent electric light?
- Could excessive contrast occur between windows and the room?
- Which lighting scenes are required as daylight changes?
The purpose is not to create one perfect daylight image.
It is to understand how the lighting concept should respond to changing natural conditions.
Standards and project requirements provide essential criteria for visual tasks, safety and comfort.
DIALux helps test a proposal against the criteria selected for the project.
But passing a calculation does not decide:
- Which architectural element deserves emphasis
- How a guest should feel on arrival
- Whether a material should appear soft or dramatic
- Where darkness should be preserved
- How one space should transition into the next
- Whether the ceiling composition feels calm
Technical requirements protect the minimum quality of the installation.
Lighting design develops everything that should happen beyond that minimum.
- Beginning the model before defining the visual task
- Using default surface reflectances without reviewing the materials
- Calculating only one horizontal working plane
- Treating average illuminance as the complete result
- Using photometric data that does not match the specified optic
- Evaluating glare from irrelevant observer positions
- Ignoring furniture, shelving and other significant obstructions
- Adding luminaires whenever a target value is missed
- Optimising numerical uniformity until all hierarchy disappears
- Presenting renderings without disclosing calculation assumptions
- Treating the first successful calculation as the final design
- Failing to fine-tune the installed luminaires on site
The most dangerous model is not an obviously inaccurate one.
It is a polished model whose assumptions are never questioned.
A useful study should allow another member of the project team to understand what was calculated, why it was calculated and which assumptions shaped the result.
Relevant plans, dimensions, ceiling heights, openings, furniture and architectural conditions.
The reflectance values and material assumptions that influence the calculated interreflection.
Product, optic, lumen output, mounting condition, quantity and positioning.
Clear locations, dimensions, heights and orientations for every evaluated visual task.
Illuminance, uniformity, glare or other values selected because they correspond to the project requirements.
False-colour views, isolines, spatial views and diagrams that help explain where the numerical values occur.
Maintenance factors, daylight conditions, operating scenes and any known limitations of the model.
The decisions that should be coordinated, tested or fine-tuned during the following planning and installation phases.
Even a carefully constructed DIALux study remains a digital prediction.
Real materials vary. Furniture moves. Decorative luminaires interact with technical light. Dimming curves influence low-level scenes. Artwork arrives. Surfaces reflect differently from small samples.
This is why on-site testing and final focusing remain essential.
Beam directions should be adjusted after furniture and important objects are in place. Scenes should be evaluated from real observer positions. Dimming levels should be tuned according to the completed interior.
DIALux reduces uncertainty before installation.
It does not remove the need to look at the light afterwards.
DIALux lighting design is the process of digitally modelling a space, inserting photometric luminaire data and calculating how light reaches defined surfaces. It is used to evaluate and document a lighting concept before installation.
No. A DIALux calculation evaluates a defined proposal. The lighting concept determines what should be illuminated, how the space should be structured and which visual qualities the project should achieve. Calculation supports these decisions but does not replace them.
A reliable calculation normally requires accurate geometry, relevant material reflectances, luminaire photometric data, mounting positions, calculation surfaces, maintenance assumptions and clearly defined project requirements.
DIALux evo can be used to model indoor lighting with daylight and artificial light. The usefulness of the result depends on correct building orientation, location, window geometry, room structure and the daylight condition selected for evaluation.
IES and LDT files contain photometric information describing how a luminaire distributes luminous intensity. They allow the selected product and optic to be represented more accurately within the calculation model.
Differences in geometry, surface reflectance, luminaire data, calculation grids, maintenance factors, daylight settings and mounting positions can all change the output. Results should therefore always be reviewed together with the assumptions used to create them.
No. Illuminance is only one part of lighting quality. Glare, vertical illumination, contrast, surface brightness, colour quality, visual hierarchy and the relationship between light and architecture must also be considered.
A DIALux study should do more than confirm a luminaire layout.
Studio De Schutter connects architectural lighting design with technical calculation, visual evaluation, coordination and on-site fine-tuning.
The objective is not simply to reach the required values.
It is to create a space in which those values support the right visual experience.

Contact Us:
